Hello! I'm a little burned out on making quilts right now so I started working on the Trapezoid Tote by Indygo Junction. The pattern has two options: use one-piece for front and back or use strips and piece them. I elected to make the totes using both methods. There are a lot of pieces and 8 pages of detailed instructions. This is a pattern I recommend you try. What grabbed my attention was the shape. What you may not be able to see is that the sides have gussets that expands as needed. I have all of my pieces prepped to sew together. Bad news/good news. No sewing on them today as I have a lecture I need to prepare for later this evening. I'm giving a lecture on machine embroidery in quiltmaking.
Also, I wanted to show you how I organize my patterns that has a lot or rather large templates. After opening the pattern and making the templates to cut the pieces, I knew if would be a chore to get the pattern back into the original packet. I made a copy of the pattern front and supplies page and tape that to the front of a large envelope. That way I can see what's inside and know what supplies I need to make the project.
Happy Monday! To see more design walls, visit www.patchworktimes.com.
--------------------------
Type-u-later,
http://www.teaquilts.com
Monday, November 11, 2013
Saturday, November 9, 2013
Round Robin/Design Wall
Yeah!!!! I finished my last round robin. This beautiful quilt belongs to Debra. I added the churn dash/arrow border. I think her quilt is a modern take on traditional quilt-making because of all of the white background. The center is machine embroidery flower blocks so in my border I decided to use floral fabrics in the churn dash blocks (all different fabrics in each block) and added the arrows as spacers. This quilt was fun but tedious to make because of all the pieces. Debra received her quilt today. Sadly, my quilt top wasn't finished on time so I can't show it in this post.
The other project I'm working on is my batik circles. I used my bullseye nested dies from Accuquilt to cut all the circles. It took me longer to prep and iron the fabrics. They have stabilizer on the back. I'm working on stitching them approximately 1/8 of an ince around the raw edges. I didn't want to use the button hole stitch on these.
-------------------------- Type-u-later, http://www.teaquilts.com
Monday, October 21, 2013
Design Wall Monday
I haven't done much sewing until today. I'm actually working on churn dash blocks for a round robin quilt. However, I got a little bored because it wasn't what I really want to work on. I would have love to make a new Halloween quilt but I didn't get started earlier. I definitely didn't want to add stress by trying to get it completed by next Thursday.
So, I decided that since my mother loved the spiral table runner I made her last year for Christmas that I'd make her another one. Here is the one I made last year using a 9 degree wedge ruler.
Yesterday I pulled a few Christmas theme prints from my stash. I even got to use an old JoAnn's fabric (last green fabric on right) from a block of the month so long ago that I can remember the year. I'd decided years ago that I wasn't going to use the border fabric as intended.
I took those fabrics and cut strips and sewed them into stratas. I then cut the stratas with a 10 degree wedge ruler. I love the colors in this one! Also, instead of organizing the fabrics from light to dark like I did in the first runner, I organized them from one color family to another color family. That made the light areas float in the center.
\Here is a comparison of the two sizes. Also note that I have two extra strips in the Christmas runner that I wasn't able to cut the first time I made the quilt.
I still had a little time left before bed and I also got to play with another project using Christmas fabrics. Now I need to figure out what to do with the center; pieced or plain.
-------------------------- Type-u-later, http://www.teaquilts.com
Thursday, October 17, 2013
Let's Make Churn Dash Blocks
Hi everyone.
I've been extremely busy again. Now that the quilt show is over, I've been spending time planning our annual line dance party which happens the 1st weekend in November.
I wanted to stop in to post a link for a video I made on making Churn Dash Blocks. I'm trying to play with making videos and my editing skills are not up to par. However, I'm sharing the video with you anyway. I will look into some other software program for editing. That will also mean I'll need to practice to learn that software so it may get worse before it gets better! LOL
-------------------------- Type-u-later, http://www.teaquilts.com
Sunday, October 6, 2013
Facebook and Quilt Sampler Store Review
Hi everyone! I want everyone to know that I now have a Facebook page called Teaquilts. Please click on the following link and like my page to become a member. It's a much faster way to communicate, without having to post to a particular page on the blog. https://www.facebook.com/groups/Teaquilts/
In July I drove to Joplin, MO and made an impromptu stop in Springfield, MO to visit the Quilt Sampler store. By my wishing this store was closer to the St. Louis Metropolitan area, you should already know my opinion. Apparently I missed a weekend sidewalk sale where I could have purchased a LOT of items at great discounted prices. However, I did shop their clearance area and they had many, many bolts of batiks at $7.99 per yard and regular quilt cottons at $6.99 per yard (they could have had some cheaper, but I don't remember or maybe I didn't like the cheaper per yard fabrics). My "no buy" plan went out the door with a previous customer! I don't think I've ever seen a larger display of sale fabrics that were things I absolutely had wanted to purchase. These were excellent quality fabrics that they needed to sale to make room for new bolts. Let's say my little road stop turned into a 1.5 hour visit!
This is the entrance, with the checkout to the left. The first thing I noticed was that the store was very bright! They are renting two store fronts so the area is nice and roomy. When I enter quilt shops, I'm most impressed by lighting. That way I know exactly what I'm purchasing, getting the shade, tint and/or hue of fabric that I need. I just stood here a minute to contain the excitement as I looked around the store.
Here are a few pictures of the displays. They had all kind of quilts/projects hanging from ceiling. They had many, many bolts of fabrics that I didn't get photos of. Their range of fabrics is suitable for country, modern, traditional, 30's and the batik wall (yes, wall) was to die for.
Then to my right I spotted the machine embroidery supplies and I ran over there first! I searched the wall for designs and looked at all the display items. Let's just say I spent quite a bit of money in this section. I purchased two Sarah Vedeler designs and some other items as well.
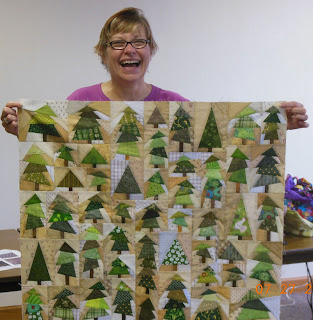
Looking at the display reminded me that I had that scenic tree quilt on the left. Now, I want to make that too.
This feathered star design was beautiful but I couldn't purchase because it wasn't in stock.
Now you know any time you are on the road and you've spent considerable time in an establishment, you will need to use the restroom. This is the mural that is painted on the wall. They look so real. I had to pause and inspect that as well.
Ladies, bathrooms are important to us. I don't expect a lot but I do want it to be clean. This one was definitely clean, but it was probably the largest bathroom I've seen in a quilt store. It was also handicap accessible and everything worked! LOL
I do insist that if you are in the Springfield area that you stop by the Quilt Sampler. All the staff were attentive and very friendly. They answered questions, pointed me in the right direction and gave me advice if their store didn't have it or couldn't supply it. It is definitely work a look. Two thumbs up!
--------------------------
Type-u-later,
http://www.teaquilts.com
In July I drove to Joplin, MO and made an impromptu stop in Springfield, MO to visit the Quilt Sampler store. By my wishing this store was closer to the St. Louis Metropolitan area, you should already know my opinion. Apparently I missed a weekend sidewalk sale where I could have purchased a LOT of items at great discounted prices. However, I did shop their clearance area and they had many, many bolts of batiks at $7.99 per yard and regular quilt cottons at $6.99 per yard (they could have had some cheaper, but I don't remember or maybe I didn't like the cheaper per yard fabrics). My "no buy" plan went out the door with a previous customer! I don't think I've ever seen a larger display of sale fabrics that were things I absolutely had wanted to purchase. These were excellent quality fabrics that they needed to sale to make room for new bolts. Let's say my little road stop turned into a 1.5 hour visit!
This is the entrance, with the checkout to the left. The first thing I noticed was that the store was very bright! They are renting two store fronts so the area is nice and roomy. When I enter quilt shops, I'm most impressed by lighting. That way I know exactly what I'm purchasing, getting the shade, tint and/or hue of fabric that I need. I just stood here a minute to contain the excitement as I looked around the store.
Here are a few pictures of the displays. They had all kind of quilts/projects hanging from ceiling. They had many, many bolts of fabrics that I didn't get photos of. Their range of fabrics is suitable for country, modern, traditional, 30's and the batik wall (yes, wall) was to die for.
Then to my right I spotted the machine embroidery supplies and I ran over there first! I searched the wall for designs and looked at all the display items. Let's just say I spent quite a bit of money in this section. I purchased two Sarah Vedeler designs and some other items as well.
Looking at the display reminded me that I had that scenic tree quilt on the left. Now, I want to make that too.
This feathered star design was beautiful but I couldn't purchase because it wasn't in stock.
Now you know any time you are on the road and you've spent considerable time in an establishment, you will need to use the restroom. This is the mural that is painted on the wall. They look so real. I had to pause and inspect that as well.
Ladies, bathrooms are important to us. I don't expect a lot but I do want it to be clean. This one was definitely clean, but it was probably the largest bathroom I've seen in a quilt store. It was also handicap accessible and everything worked! LOL
Monday, September 30, 2013
Quilt Show Write Up
I had a wonderful time being featured quilter at my guild's quilt show this weekend. Here are pictures of my booth.
One of my bed size quilts won 3rd place. Yeah for my Shakespeare in the Park quilt. Thanks Sarah Cohen Brandt for quilting a masterpiece. You also won a ribbon!
Click for my final video on the Mariner's Quilt. I even got to drive it on the parking lot. The quilt was definitely a conversation piece. It built so much excitement that by the time the show patrons approached the entrance, they were really excited to have come to the show.
I want to thank Judy Kooi the the panel on the back of the vehicle; Debra Hamman for allowing me to use her long arm machine to quilt the gigantic panels; and last but not forgotten, my late friend Karen Harrison for motivating me to get this project completed.
FYI - During the first 2-3 hours the patrons didn't know they could vote for the car quilt. I was pleasantly surprised when the project won 2nd place in the Miscellaneous category. Thanks everyone!
-------------------------- Type-u-later, http://www.teaquilts.com
Labels:
2013 Finishes,
award ribbon,
car,
car quilt,
QUILT SHOW,
scrap
Monday, September 23, 2013
Design Wall Monday
Hi everyone! I'm getting excited about this project. I still may not have The Mariner's Quilt completed by Saturday, but I will have enough completed so that is can be in the show. The body of the quilt is sewn into one section with an opening on the driver's side; the top panel has been adjusted so that is doesn't sag as much; the red panels will be attached with hook and loop tape. To see all sides of the car, view the video below. Thanks for watching.
Also on my design wall are two machine embroidery projects that I'm working on. They were both a lot of fun! I find I'm loving the embroidery with "embellishments" over the standard embroidery designs. The first is a design by Sara Vedeler and the second is by Husqvarna. The first will be a pillow and the other a small wall hanging.
Kool Kalideoscope
I finished my 2012 retreat project from the book Kool Kalidescopes. I finished the top during retreat and even went so far as to pin the top for quilting. I chicken out at the quilting stage and it sat for 1 year and 8 months. The quilting isn't perfect, but it done.
-------------------------- Type-u-later, http://www.teaquilts.com
Wednesday, September 18, 2013
Scrap Quilting Club
This is a quick post to show scrap quilting club's August projects. Note, that this is four posts in 4 days - just short of a miracle. Enjoy the Show-N-Tell:
Every July, I try to assign a project that can be easily made for Christmas gifts. This year Connie taught us how to make the snap bags. This pictures shows those that got them done in class.
The true over achiever this month! Jennifer is making the yearlong project 1/3 or it's size.
-------------------------- Type-u-later, http://www.teaquilts.com
Tuesday, September 17, 2013
Some 2013 Finishes
Here are a few finishes this year; proof that I'm still quilting. LOL
The "T Quilt" is a guild challenge quilt. The main rules were to make a quilt with blocks that begin with the initial of your first or last name. Now, anyone that knows me knows that if I make any sort of quilt about "me", it will reek of me! I had been working on the Trailing Geese units and had them in my works in progress storage for years. I pulled some of the units out and made a letter T with them. In addition, I made Tumbling Blocks; I had cut 45 degree diamonds left over from a previous project so I had a great start there too. I then pulled 3.5" Tumbler units I'd already cut on my GO! cutter. I made all of these things go into one quilt. I won 2nd place for most creative use of blocks.
I had help finishing the Pineapple Nine Patch quilt. It will hang in the quilt show so I went to one of my favorite long arm quilters, Sarah Cohen. She used orange thread and the quilting is fabulous! This pattern is designed by Cathy Wierzbicki from book Geometric Gems. This link is not necessarily the cheapest price, but you can see all the designs in the book. I saw cheaper prices at online stores: Barns & Nobel, Target, and WalMart.
I also had Sarah Cohen quilt the Shakespeare in the Park quilt too. This one took so many years to complete to end up with mediocre quilting. I used three colorways instead of two and that almost burst my brain to keep all my pieces straight. I did have to use the seam ripper a couple of times on this one. I'm glad it's finally done and love everything about this quilt. This design is by Judy Martin and on Sunday the book with this pattern was $9.95. You can purchase by clicking this line.
I know I haven't listed all the finishes but I must not have taken photos. More to come later...
-------------------------- Type-u-later, http://www.teaquilts.com
Subscribe to:
Posts (Atom)