Monday, May 31, 2010

Design Wall Monday

First, have a great Memorial Day!  I still need to see where my family is meeting today to celebrate.  I've just returned home from a quilt retreat weekend.  I have a lot to show-n-tell that will be in the next few posts.  I'll post pictures of the miniature challenge we had and show more variations of the X-Blocks group project.  In addition, I will also photo of the hidden wells quilt I finally got photographed today.

First, for DWM, I worked some more on my Cathedral Stars top.  I now have 18 of 36 star blocks completed.  I put them on the design wall at retreat to show my progress before moving on to the next project.

Then I got to work on my Venetian Tiles (now called Crown Jewels) X-Blocks first quilt top.  This one is the first I started and made only a few blocks to teach in class.  So, I buckled down and made all the blocks and got the top pieced.  Now, it needs borders.

These are the border units I'm working on for the quilt above.  This border will have accurately sized units as opposed to the quilt tops listed below. 

Then, I started work on another X-Block project that I only had one block made prior to retreat.  I got all the blocks made and pieced it into a top.  I haven't figured out borders yet.  Do you see hearts?  If not, maybe you see what my retreat girls saw, women chests?  One said she would add lace, buttons, and something else I can't recall right now due to lack of sleep.

I did not work on these at retreat, but wanted to share this top that not quilted while on the subject.  Another X-Block design just to show the differences.

Again, another X-Block quilt top I haven't quilted to show design variation.

I feel like I should be listing something else but I can't remember.  However, if you enjoyed this design wall, go over to Judy's site to see more.
--------------------------
Type-u-later,
Tea in MO
http://www.teaquilts.com

Monday, May 24, 2010

Design Wall Monday

This week I have been working on hand applique blocks and projects with my Scrap Quilting Club.

I have 3 blocks made for the Pushin' Up Spring BOM.  As mentioned last Monday, I made two blocks using the back basting method.  While I understand the need is necessary in certain applique designs, I will not be continuing the method with this project as placement is not as critical.  You can read my comments on this blog post.  Here are my completed blocks so far.  This is not my design (copyrighting the photo only), but a BOM available from Apple Blossom Quilts; click on newsletter and sign up.

Saturday my scrap quilting club met and we had show-n-tell on the Bento Box quilt tops.  In addition, the group's projects for the day was to make at least 50 signature blocks that will be swapped at a future guild meeting to celebrate our 25th anniversary.  For once, we are being proactive instead of reactive as the blocks are due at the August meeting.  Here are mine.  I made 100 blocks as I want people not participating in the swap to sign blocks for my quilt.

Then I gave the next assignment on the Cathedral Stars long term project.  The 305 4-patches were due this meeting so now I have assigned 100 HSTs; and if time permits, make 25 of the blocks on the left.  I'm working a few steps ahead of the group so I can provide assistance.  Here are my two blocks I sewed for demonstration and the rest of my pieces to complete all of the blocks.  The projects feels much more doable when the cut pieces becomes block units.

Hope you had a productive week too.  To seem more design walls go visit Judy.
--------------------------
Type-u-later,
Tea in MO
http://www.teaquilts.com

Sunday, May 23, 2010

Scrap Quilting Club

My Scrap Quilting Club met yesterday.  They reported in with their Modified Bento Box quilts.  The pattern can be found here.  Most of us swapped quarters and still the quilts look so different from each other.  Some participants missed this meeting as they were in class with a national speaker so more of these will be forth coming next month.


Twist and Shout from last month.  For more information on this pattern and class quilts, go here.
-------------------------- Type-u-later, Tea in MO http://www.teaquilts.com

Wednesday, May 19, 2010

Prize Mailed and 2nd Block Finished

All quilters need staples!  Not, the kind in a stapler, but these:
This is Mary's prize I mailed yesterday.  It includes 50 Moda Marbles charm squares in a collectible tin and charm squares of the Moda Shimmer collection.  These were some of my Paducah, KY purchases during the AQS show.  Have fun with these Mary.

I finished my second Pushin' Up Spring block (actually the 1st block in the BOM) using the back basting method.  The jury is still out as to whether or not I like this method.  It's advantages are that no templates are needed to draw out applique fabrics, the fabrics are accurately placed where you want it, and I didn't have to remove markings after block was completed.  Disadvantages, for me, were that it took longer to sew the block than with traditional applique and I felt a little lost in some areas when I needed to take out more basting stitches than normal to get an area just right.  Sometimes I felt as if I was sewing blindly, especially when I had to stitch over another applique fabric already sewn.  I've decided to do my third block in back basting method to see if I improve.  I love the technique and think I may have a way to satisfy at least one of my issues with the method.  This is not my design (copyrighting the photo only), but a BOM available from Apple Blossom Quilts; click on newsletter and sign up. 
 --------------------------
Type-u-later,
Tea in MO
http://www.teaquilts.com

Tuesday, May 18, 2010

Half Square Triangles Tutorial Part 7

LAST HST TUTORIAL

Bias Strip Method

Cut two squares or rectangles.
Stack with both fabrics right sizes up.  Using the 45 degree line on the ruler, cut from bottom corner to top edge.

Using the chart below, cut the triangles into strips the required width (in this case 2.25”) starting along the widest diagonal.  You will have something like this.

Alternate the strips as shown in photo, making two grids.

Sew the units into two grids with ¼” seams along the long diagonal edges. Make sure you have two sides of the square even after sewing.

Beginning in the corner where two sides are even and using an acrylic ruler for cutting bias squares, align the diagonal line on the ruler along the sewn bias seam line. Cut the bias square out a little bit bigger than needed (in this case for 2.5” unfinished bias squares, cut 2-5/8”.)


Turn the HST around and square up to the finished size of triangle required. Continue in the same manner until you have cut as many HSTs as possible from the grids.  

Here are my finished HSTs from one grid.  Sometimes I'm able to cut smaller HST from the waste.  I'll use the "extra" HSTs in some future project.
Pros:
1.  Make as many triangles as you need as you can enlarge the square or rectangle to accommodate requirements
2.  Great if you want a scrappy look to quilt.
3.  The pressing is done before the cutting so squares are not distorted during ironing.
4.  Very accurate as squares are cut after sewing and pressing.

Cons:
1.  Some fabric waste.


Width of Bias Strips     Finished Square
1.5”                             1”
2”                                1.5”
2.25”                           2”
2.75”                           2.5”
3”                                3”
3.25”                           3.5”
3.75”                           4”
4”                                4.5”
4.5”                             5”
4.75”                           5.5”
5.25”                           6”

Hope you enjoyed the HSTs tutorials.
--------------------------
Type-u-later,
Tea in MO
http://www.teaquilts.com

Monday, May 17, 2010

Design Wall Monday

I finished binding on Hidden Wells quilt but it's been raining so much I wasn't able to go outside to get a photo for the blog.  It will be posted sometime this week, weather permitting.

I worked on the Batik bento boxes and have the top sewn.  I have also picked out a border print.

A few of you commented about wanting to see the finished Pushin' Up Spring sunflower block.  That motivated me to finish it as I didn't want to be a failure in blog land.  LOL  I then sat down Sunday and cut fabrics for 4 more blocks.  I only got one pieced and decided I need to get moving on picking out the fabrics for the applique portion so I can take it to work where I can sew during lunch.  These are some large blocks so I'm still not sure how many I will make at this time.  The first block I made with traditional needle turn technique.  For the second one, I'm trying the back basting method.  This is my first time trying this technique; I'll let you know if I like it or not next week.  This is not my design (copyrighting the photo only), but a BOM available from Apple Blossom Quilts; click on newsletter and sign up. 

My last project I worked on this week is the Cathedral Stars.  I have 152 of 305 4-patches made.  So I cut more strips and sewed them together.  I now need to cut the strips into 2" segments and sew them into 4-patches.  Hopefully I have enough that I will complete this step.  In addition, I made the 100 HSTs for same project.  I am working on 100 Tri/Rec units; everthing is cut for them.

Being sick all week (bad sinus problems) motivated me to work hard this week end to play a little catch up.  If you'd like to see what other quilters have on their design walls, visit Judy.
--------------------------
Type-u-later,
Tea in MO
http://www.teaquilts.com

Half Square Triangles Tutorial Part 6

First, I put in yesterday's HST tutorial that it was my 100th post.  What I didn't say was that I was also having a drawing of those who responded.  I had 2 comments for the post and Mary LeClerc won.  Mary send me snail mail info and I'll send you a package in the mail.

For this tutorial, I'm combining Drawn & Stitch Grid and Paper Piecing Techniques.

For both techniques, you are sewing on some sort of grid, with the exception being that in the Drawn & Stitch Grid, you are drawing it yourself.  See photo below (sorry about quality of picture; I uploaded an old photo as there was no way I was going to draw a grid.)  Determine the finished size of the two-color square and add 7/8” to this measurement. On the wrong side of the lightest-color fabric rectangle, draw a grid of squares that is this measurement. Mark diagonal lines as shown. With right sides together, pin the marked fabric on top of a contrasting. Sew ¼” from the line. Cut the squares apart on the drawn lines.

Here are the HSTs!
 Pros:
1.  Make many triangles at once.
2.  Not handling bias edges.

Cons:
1.  Time consuming to draw the lines.
2.  Need to trim dog ears after sewing.
3.  Sewer do need to be able to accurately sew on the lines.

Solutions:
1.  Use paper pieced grids produced by various companies (see below).
2.  Another option is to draw the grid 1” larger than finished size of triangles and square up the triangles after pressing.

So because I don't want to spend my sewing time drawing grids.  Consider using one of the many products available to make half square triangles.  Here are the three types I have in my stash with explanations below the photo.
1.  “Thangles” are paper template strips for turning straight grain strips into half square triangles (HST). For example, if you want a 2" finished HST, you cut 2 1/2" strips of your two fabrics, place right sides together and use THANGLES. Pros: NO more confusing math...no more 7/8" and cutting of odd sizes of fabric, make half square triangle construction easy and fast. Cons: must purchase product, must purchase product for EACH size HSTs you want to make, pinning through paper leaves humps and they are not as accurate as other paper piecing HST techniques.


2.  “Triangles on a Roll” are used in the same manner as Thangles except you can decide how long a piece of grid paper you want to work with; great for scrap quilts. Pros: just cut approximate size squares and rectangles. Cons: must purchase product, must purchase product for EACH size HSTs you want to make, pinning through paper leaves humps.

3.  Triangulations which is a software program where the user print grids in the size needed for HSTs using your own printer.  I've been using this product for about a year and find them to print very accurate.  The best feature is that they give you a trim line to cut the dog ears while the HSTs are flat (before pressing).  Pros:  just approximate size squares and rectangles, very accurate, don't have to purchase expensive HST paper, print only what I need in size that I want- no storage of papers needed.  Cons:  must purchase product, pinning through paper leaves humps.

For this tutorial I'm making 2" finished HSTs for a project I'm currently working on.  Sorry about changing sizes.  I have printed a page from Triangulations CD.  The great thing about the software is that I can print only what I need.  Since I'm working on a scrap project, I need a lot of different HSTs.  I cut the page on lines where I want to change fabrics.

Cut two fabrics slightly larger than the grid (note that I trimmed the grid down so you can see my fabric underneath.)  Place the two fabric right sides together.  Pin the grid on top of the fabrics.  Sew on all dotted lines.

Cut the grid apart by first trimming around the outside.  Then cut apart on all solid lines.  What's great about Triangulations is that they give a trim line to trim the dog ears while the HST is still flat.  I have been doing that for years.  At first I used a HST trim ruler (can't remember name at the moment).  It was so tedius that I started to eye ball the trim spot with great accuracy.  So, even if your paper doesn't have the trim lines, trim the dog ears while the unit is flat.

Here are some of my scrappy units made from the paper piecing grids.

I hope you are enjoying the tutorials.  I have one more method to show you tomorrow.
--------------------------
Type-u-later,
Tea in MO
http://www.teaquilts.com

Sunday, May 16, 2010

Half Square Triangles Tutorial Part 5

Squares Technique #3


With the previous technique in tutorial part 4, we made two HSTs from a square. However, accuracy is still a factor with all the prevous HSTs tutorials. One solution is to make the square large enough so that both halves can be sewn to the correct size for your pattern.  Also, cut your square 1" larger than finished size as compared to  7/8" in tutorial #4.  So, cut 2 squares 4" from two different fabrics.

Draw a line diagonally from corner to corner on one square.  Place right sides together and sew 1/4" on each side of drawn line.

Cut apart on drawn line.

Now you have two HSTs.  But wait, they are too big.  We need to square them to size.  I will describe three types of rulers in the market you can use. 

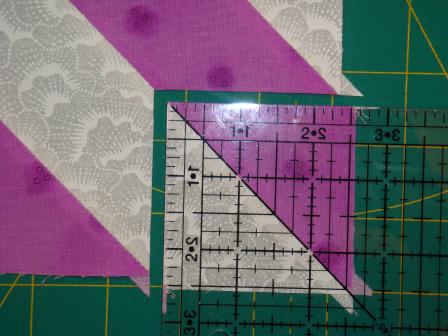
The traditional square up ruler is made by many companies in various different sizes.  I want to emphasize using a ruler compatible to the size square you are squaring to size.  Don't use a 12.5" square up ruler to trim a 4.5" HST.  Use one that is 4.5" or 6.5".  In photo below, I was just too lazy to retrieve my 4.5" ruler.  To use this ruler (I'm LEFT HANDED so bare with the photos) place the diagonal line of the ruler on the diagional seam of the HST.  Note that I have a little room to trim the HST to 3.5" on all edges of the unit under the ruler.  Once you are satisfied, trim the left and top edges of the HST.

This photo show the left and top edges trimmed. 

Turn the partially trimmed HST 180 degrees.  Again, place ruler with diagonal line on seam line of HST. Note in photo below that the 3.5" lines on the ruler is now aligned with the edges we trimmed in previous photo.

Again, trim left and top edges.

Here is your perfect HST!

June Tailor has a square up ruler that is a little different called "Perfect Half-Square & Quarter-Square Triangles.  It's my favorite method to use when making scrappy HSTs.

The packaging gives detailed information on how to use this ruler.  Here is a quick lesson.  Place the half square triangle under the ruler with one of the diagional lines on the seam of the HST. It is important that the HST is placed between the cutting lines for the size you want but with scant amounts overlapping so you can trim.  Does not have to be centered.  I then cut on the two 3.5" slots in the ruler. (Hopefully the photo shows this.)

This what I have after cutting through the two slots at 3.5"  I pulled the HST up a bit so you can see what was trimmed.

Now turn the HST one quarter turn.  Place the ruler back on the HST with diagonal along the seam line and the TOP 3rd line going left to right is on top of the HST.  (This is hard to type, so look at photo carefully.  The first horizontal line above the 45 degree markings would be used for 1.5" HST, the 2nd for 2.5" HST, etc.  Trim again in both 3.5" slots.

This is what you will have after trimming.  Another perfect HST!

This method is a little different using the HST ruler from Quilt in a Day.

Do NOT press HST open to use this ruler! HST is squared up prior to pressing.  For a 3" finished HST, place the 3.5" line on the ruler with the seam line of your HST.

Trim on both sides of the ruler as shown.

Press seams open and ta-da, you have a perfect HST!  Only problem with this ruler is that you still have dog ears to trim.

Pros:

1. Very accurate as triangles are trimmed after sewing.
2. Do not have to handle bias edges.
3. Using two of the rulers above takes care of the dog ears while trimming.

Cons:
1. You will have to draw a diagonal line down the center and if you are making a lot of squares this can be tedious. You could use the Angler 2 to sew seams or mark your sewing machine bed.
2. Need to trim dog ears using one of the above rulers.
3. Is time consuming to square up the HSTs, expecially if you need 200 of them!
4. Will need to invest in square-up ruler/s of your choice.

Solution:
1. If you need a lot of HSTs, try using paper piecing method, grid piecing method, or bias strips method. These topics will be discussed in future tutorials.

If you have used these rulers, leave a comment on your favorite.

PS - This is my 100th post!
--------------------------
Type-u-later,
Tea in MO
http://www.teaquilts.com